SnapTable PRO Hyper-lite
Buy the SnapTable PRO Hyper-lite today!
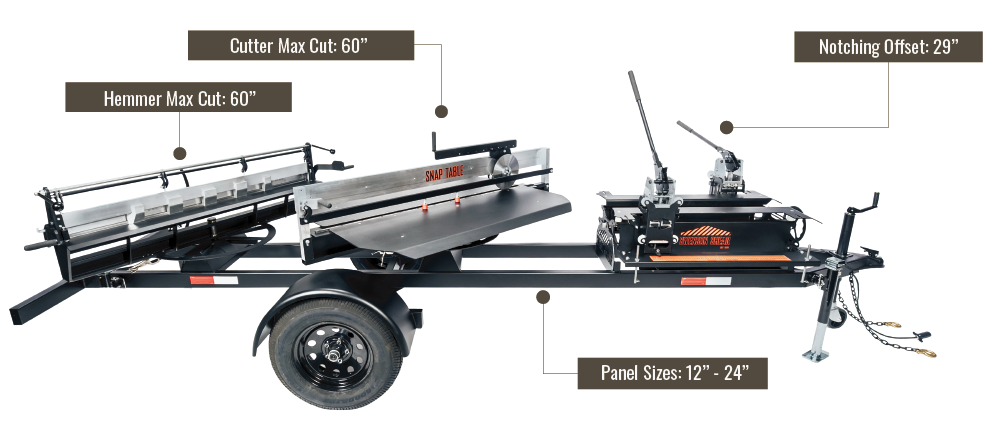
The SnapTable PRO Hyper-lite is recognized for its ability to simplify the preparation of standing seam panels, saving both time and money while allowing contractors to take on more jobs and gain a competitive advantage within the industry. The SnapTable PRO Hyper-lite is a towable, all-in-one metal roof panel preparation system for standing seam metal roofing projects. It is designed to perfect and speed up your sheet metal roof panel preparation process while producing factory-like cuts.
Contact us to learn more:
SnapTable PRO Hyper-lite PRO FAQs
How Do I set the offsets on the Snap Table?
Offsets (Angles) are set using the offset-degree indicator on the operator side of the table
- Find out what the offset for the valley is
- Set the pointer on the notcher to the correct offset position on the ruler
- Set the Notcher lock located directly underneath the offset chart. This will prevent notchers from shifting.
Video:
How Do I hem a trailing edge instead of leading edge?
Rotate Hemmer to 180 degrees for trailing edge hems.
What if I do multiple profiles?
One set of notchers are included with SnapTable PRO Hyper-lite purchase. Additional notchers are available to accommodate multiple profiles.
How do I adjust the machine for different panel widths?
A wheel is located at the front of the machine that adjusts to accommodate different panel widths. Locate the locking T bolt which is located on the right-hand side of the wheel. Loosen to adjust, tighten to keep width from changing. This machine can accommodate panel widths from 12”-24”
What if I need to close the Rib of the Standing Seam Panel?
Follow these Steps to Create Your Tab Over:
- Once notchers are set at correct offset, shift the notcher to add an additional inch on female rib (Example if you are doing a 9/12 valley- move to 10/12 on offset chart). This allows you to snip back one inch of female rib to create the tab bringing you back to correct offset.
- Notch, then cut panel to length
- Use your Tin snips to cut 1” back on pan against the rib, cut top of rib back 1”, cut up and remove outside of rib, then fold it over with your hand. Snip excess to clean up tab.
- At the hemming station, both sides of Standing Seam must hit flush against fencing inside the hemmer. Clamp down and hem over.
What gauge thickness will the machine allow for?
Suggested Maximum panel thickness is 20 Gauge
How do I swap profiles?
For a standard set of Notchers, insert safety pin and lift the notcher directly up to remove notcher from carriage, then insert new notchers into carriage.
Swapping from a Standard Notcher to an Angle Notcher:
To install the angle notcher you need to:
- Remove the standard carriage by removing the top two bolts and the bottom center bolt.
- Remove carriage, (put hardware back on carriage for safe keeping).
- On Face of subcarraige you will see 2 5/16” bolts with nuts (remove nuts)
- The angle notcher has two bolts on bottom Important: Bolts have washers and nuts that are used as spacers *Do not remove) The end of the bolts will set into holes on sub carriage.
- The T brackets on face of angle notcher will slide over preexisting bolts that you just removed nuts from on step 3.
- Replace and tighten nuts.
Watch Video:
When do I need to adjust the Slitter Wheel?
The Slitter blade will only need to be adjusted when changing panel thicknesses. For thicker panels, drop blade down, for thinner panels raise the slitter blade. *Never go above an 1/8” reveal.
Note: If oil canning occurs, raise the slitter blade.
How do I check to see if the notchers are square?
Use framing square to mark top of male and female rib. Ensure marks are square. Bring the notcher on the operator side down over rib. Align the mark on top of the rib to inside of right rib die. Once mark is on inside of right die bring down non operator notcher. If the mark on the opposite rib is not on the inside of the right die, the notchers are not square.
Adjust notchers accordingly until both marks of the panel are on the inside of right die. Once you have achieved this, loosen 4 bolts on offset chart bracket. Adjust offset chart plate until tip of pointer is directly over 0. Tighten bolts, notchers should now be square to your offset chart.
What Maintenance should be performed?
The notcher should be cleaned and oiled lightly. Cleaning is required to remove surface sand or dirt. Lightweight oil is ideal for keeping the die transport mechanism and lever system working smoothly. Most snap table parts are either powder coated for weather protection or are made of aluminum to resist corrosion. *DO not use WD40 or any lubricants that are sticky. We recommend using a CRC Food Grade Silicone spray for the dove tail slides located inside of the notcher carriage.
What products can I use to clean the SnapTable?
House Hold Cleaning Products may be used on the machine. Use a scotch bright pad for aluminum and stainless-steel parts.
What steps do I need to take to register the trailer?
You will receive a manufactures certificate of origin in the mail along with the invoice. Register your trailer at your local DMV as Special Construction Equipment.
If you need additional assistance, please call Swenson Shears Technical Support Line:
Technical Support- 877-588-8748 Option #2